Throw rings—sometimes also called hanging rings—make our beloved tatting even more beautiful, but also a little trickier.
When simple rings are worked in rows, their opening usually points downward. Floating rings, on the other hand, usually have their opening at the top. They hang downward (which is where their name comes from).
Technically, they are completely normal Rings, BUT they are made with the ball thread instead of the shuttle thread. This means we have to separate the ball thread from the ball and wind it onto a second shuttle. If this is your first time working with two shuttles, I recommend reading my article about the front and back side in tatting..
You will need
- smooth cotton thread (for example size 10 crochet cotton with a yardage of about 280 m / 50 g)
You will find various sources for this yarn in my shop and product recommendations. - two shuttles (preferably different ones)
If you have two identical shuttles, you can place a small sticker or colored dot on one of them. If you prefer not to do that, you can also work with two different thread colors, simply tying them together at the beginning..
For left-handed tatters: The words “left” and “right” do not appear in the text. You can simply mirror the pictures using any image editing software. The instructions will still work.
Whenever individual fingers are mentioned in the text, they always refer to the fingers of the holding hand (the left hand for right-handed people and the right hand for left-handed people).
Make a throw ring
- Preparation
Wind your thread onto both shuttles and make sure you remember—or write down—which end is the shuttle thread (shuttle 1) and which is the ball thread (shuttle 2).
- Ring and Chain
Using shuttle 1, make a simple ring with 8 double stitches, close it, and start a chain with 4 double stitches.
- The throw ring
Now take shuttle 2. The floating ring begins exactly like a simple ring—with a flipped over-stitch. The difference is that it is worked from the back side of the work and with the second shuttle instead of the first. Close the ring after 4 double stitches.
- Finish the Chain
Now take shuttle 1 again and continue the chain with 4 more double stitches.
- Practice
To practice, repeat steps 2–4 until one of your shuttles is empty.
- How to Tell Shuttle 1 from Shuttle 2
Different colored threads and colorful shuttles make it easier to keep track in the beginning. At some point, however, you may want to work in a single color without stickers or markers.
So how do you recognize shuttle 1?
The thread from shuttle 1 is the inner thread in:
- simple rings
- normal chains that curve upward
- split rings
In most cases, you only need to look for the inner thread.
Only in floating rings or chains that curve downward does the inner thread come from shuttle 2.
How Floating Rings Appear in Patterns
I abbreviate floating rings as tR.
They are usually part of another element, similar to a picot.
In the example above, the floating ring is part of a chain, so it appears within the chain instruction. The double stitches of the floating ring are written in parentheses to distinguish them from the chain stitches.
A: R 8
B: ch 4 tR (4) 4
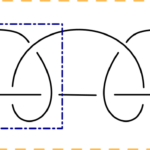
Several rings can also hang from a single chain:
C: ch 4 tR (3 – 3) 5 tR (3 – 3) 5 tR (3 – 3) 4
In diagrams, floating rings look just like normal rings. You can recognize them by their position along the chain.

Bravo! Now you can even make floating rings, and you are ready to try myFloral Edging Vesna. . You can also practice on the small "cord" edging.
Was the tutorial clear? Do you still have questions? Feel free to leave a comment!