Hello and welcome to the second part of my tatting basics course. If you have successfully worked through the first part about rings, the chains in this section will be very easy for you.
- Tatting Basics 1 - Flipping Knots and Your First Ring
- Tatting Basics 2 - Chains
- Tatting Basics 3 - Picots and Joining
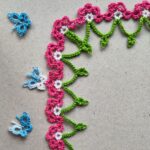
There are tatting laces that consist only of rings, and they have their own charm. However, most patterns go beyond that. Chains in tatting open up an additional design dimension. Sometimes they serve as a subtle connecting element between rings; sometimes they play the leading role with extravagant curves. They also provide an additional stage for hanging rings and picots.
Your First Tatting Chain Without a Shuttle
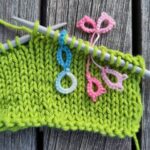
For your first chain, you only need smooth cotton thread (for example crochet cotton No. 10 with a yardage of 280 m / 50 g).
For left-handers: The words “right” and “left” do not appear in the text. You can mirror the images using any image-editing software. The text will still match.
Whenever individual fingers are mentioned in the text, they always refer to the fingers of the holding hand (the left hand for right-handed people and the right hand for left-handed people).
Let's go:
The Principle
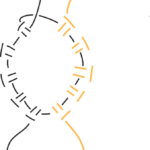
A chain in tatting is simply a thread on which knots are strung. They are therefore worked with two threads, though not necessarily with two shuttles. Depending on which of the two threads lies on the inside, chains curve in one direction or the other.
A Ring
In most cases Occhi starts with a ring. Measure about 50 cm /20 in of your thread (don't cut it from your ball of yarn). Make a ring with 10 double stitches. The loose thread, which you used for the ring is your shuttle thread. The other one, which goes from the ring to your ball of yarn is your ball thread.
Thread Position
Chains are worked from the back side of the work. However, you do not need to worry too much about that at the moment.
Wrap the ball thread around your fingers as you would for knitting or crocheting so that you can maintain some tension.*
Hold the shuttle thread in your dominant hand. Let the ring hang down without crossing the threads. This will automatically place you on the correct side of your work.

First Stitch of the Chain
The first half stitch of the chain is a flipped "over-stitch. To let the knot slide into place, extend your index finger again. The knot should be pushed as close to the ring as possible so that no gap appears. If you cannot build enough tension, wrap the thread further around your index finger or try a different thread hold.
The first double stitch is completed with a flipped under-stitch. After that, you continue alternating as you already know from making rings.
If you tilt the work toward yourself, you can count the completed double stitches on the front side.

Finishing
There is actually no real finish to a chain. Once the desired number of knots is reached, you simply stop and move on to the next element. The next simple ring is worked again as usual with the shuttle thread.
Curve Direction
Your first chain curves downward (it “smiles”). If you want the chain to curve upward, simply begin the chain with an unflipped under-stitch. This makes the ball thread the inner thread while the shuttle thread forms the knots.
How to Make a Chain in Tatting
- The Principle
A chain in tatting is simply a thread on which knots are strung. They are therefore worked with two threads, though not necessarily with two shuttles. Depending on which of the two threads lies on the inside, chains curve in one direction or the other.
- A Ring
Usually a tatting project begins with a ring. Measure about 50 cm of thread (do not cut it from the ball) and make a ring at that point. The loose thread you used to make the ring is the shuttle thread. The thread that runs from the ring to the ball is the ball thread.
- Thread Position
Chains are worked from the back side of the work. However, you do not need to worry too much about that at the moment.
Wrap the ball thread around your fingers as you would for knitting or crocheting so that you can maintain some tension.* Hold the shuttle thread in your dominant hand. Let the ring hang down without crossing the threads. This will automatically place you on the correct side of your work.
- First Knot
The first half stitch of the chain is a flipped "over-stitch. To let the knot slide into place, extend your index finger again. The knot should be pushed as close to the ring as possible so that no gap appears. If you cannot build enough tension, wrap the thread further around your index finger or try a different thread hold.
The first double stitch is completed with a flipped under-stitch. After that, you continue alternating as you already know from making rings.
If you tilt the work toward yourself, you can count the completed double stitches on the front side.
- Finishing
There is actually no real finish to a chain. Once the desired number of knots is reached, you simply stop and move on to the next element. The next simple ring is worked again as usual with the shuttle thread.
- Curve Direction
Your first chain curves downward (it “smiles”). If you want the chain to curve upward, simply begin the chain with an unflipped under-stitch. This makes the ball thread the inner thread while the shuttle thread forms the knots.
*If you do not yet knit or crochet, try searching for the term “knitting yarn tension.” There are different ways to hold the thread. The goal is always to create a certain tension in the thread. Sometimes you need to experiment a little to find the ideal technique.
How Are Chains Shown in Patterns?
In patterns I abbreviate a chain with the letters ch. A chain with 8 double stitches looks like this:
ch 8Two rings connected by a chain look like this:
R 16
ch 8
R 16
In diagrams, a chain is shown as a curved line with the number of double stitches indicated.

Chains aren’t that difficult, are they? Feel free to leave me a comment.