There are different ways to create a tatting pattern. Perhaps at this very moment someone is inventing a new system for describing a design. For that reason, it is impossible to describe all variations here—and it is not even necessary. In the next section I will explain why.
What Makes a Good Pattern?
Craft patterns are very similar to cooking recipes or computer programs. All three have in common that they can be presented in different ways. Computer programs are written in different languages, and cooking recipes exist with or without pictures. The same is true for tatting.
For a recipe, a program or a tatting pattern to work, it is important that it is self-contained. This means that abbreviations that are not commonly known must be explained at the beginning. Images must be designed so that they can be understood intuitively. In short:
The instructions should be understandable with general prior knowledge.
My patterns always include a materials section, a list of abbreviations, a section with short notation, diagrams, and a photo of the finished lace. In addition, the difficulty level and the required techniques are clear even before the download. I also provide an email address where people can contact me. This way, any questions about the pattern can be clarified easily. To ensure that everything is complete and consistent, all of my patterns go through a tech editing process.
Other designers describe the individual steps in a long block of text or present everything in a single elegant diagram. These patterns can also be wonderful. A long text can work if the tatting terminology is used consistently and, for example, no joining points are forgotten. A diagram can work if the number of knots is given precisely and completely for each element and special techniques are clearly shown. As mentioned before, the important thing is that the pattern contains everything needed to understand it—and ideally there is a way to contact the designer so that questions can be answered.
Long Notation and Short Notation
In tatting long notation refers to a text that describes what you should do.
Element A: Make a ring with 4 double knots.
Element B: Make a chain with 10 double knots.
Element C: Make a ring with 4 double knots, one picot, and 4 double knots.
The Short notation is similar to long notation. Frequently used terms are abbreviated or represented by symbols:
A: R 4
B: ch 10
C: R 4 - 4
Once you have memorized the abbreviations (R = ring, ch = chain, – = picot), short notation becomes much faster to read and patterns (for example, a steady alternation between chain and ring) are easier to recognize. In the text, you can then describe unusual joining points in more detail.
Here you will find a list of the abbreviations that I use. Other designers may use different abbreviations.
| Abbreviation / Symbol | Meaning |
| – | short picot (for joining) |
| — | long picot (decorative) |
| + | join |
| * | beginning of a repeat |
| / | separator between the first and second half of a split ring |
| ch | chain |
| sR | split ring |
| tR() | throw ring. The numbers of knots, picots, etc. are written inside the parentheses. After the closing parenthesis, the chain continues from which the ring hangs. |
| R | ring |
Diagrams
Diagrams are stylized drawings of the finished lace. Arrows and numbers indicate the starting point and the number of double knots. I find this representation very intuitive and aesthetically pleasing.
There are different variants of diagrams. Picots can be shown as a small line or as a little loop. The number of double knots can either be written next to each individual element or omitted in repetitive sections.

Here you can see a ring and a chain with a floating ring attached. For comparison, here is the short notation:
A: R 8
B: ch 4 tR (4) 4 
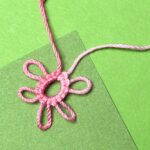
Ring with picots

Joining two rings. The rings are connected by a thread rather than by a chain.

split rings

Rings with double or triple picots
Which variant do you find easiest to work with? Feel free to leave me a comment.