Double and Triple Picots – what a delightful bit of play in tatting! Like many things in tatting, they are theoretically very simple but somehow tricky in practice. Here I will show you not only how they work, but also how to make them look really beautiful.
Required prior knowledge: simple ring, simple picot, and joining..
We will start with the double picot. Once you have worked through the instructions, you will be able to derive triple picots and even quadruple and quintuple picots from it. Sounds complicated? Grab some thread and follow along. In 10 minutes you can do all of this.
Doppelpicots
The Principle
For a double picot, we first make a simple but extra-long picot. Later, this picot will be joined back to the same element.
An extra-long picot
Start a normal ring with five double stitches. Between the 5th and 6th stitch, make an extra-long picot.
For your first attempt, you can use your first five double stitches as a guide. The distance between the 5th and 6th stitch should be about five times the length of those five double stitches.
The finished picot will then be about 2.5 times as long as the five double stitches.
A few millimeters more or less do not matter, but you need enough thread to lay the picot loosely around the next three double stitches of the ring.

Joining
After the 9th double stitch, join the picot to its own ring. Make sure the picot is not twisted. Try to catch roughly the middle of the picot. As always, check immediately after joining that the core thread can still move freely.

Closing the ring
Finish the ring with five more double stitches and close it.
Making the picot(s) look nice
The picot probably does not look perfect yet. The half closer to the ring has a shorter path than the outer half. You can gently pull a little thread out of the join so that both halves have an even distance from each other.
Because these picots leave relatively long threads exposed, they benefit especially from pressing with an iron. With cotton thread you need high heat and steam. The result will be more durable if you starch it. With polyester thread, low temperatures are already enough to fix the shape.
Before starting a project with multiple picots, make a few test rings to determine the optimal picot length.
For evenly sized picots in different lengths, a picot gauge can also be helpful.
You might also want to take a look at my article about maintaining flow while making picots. maintaining flow while making picots..
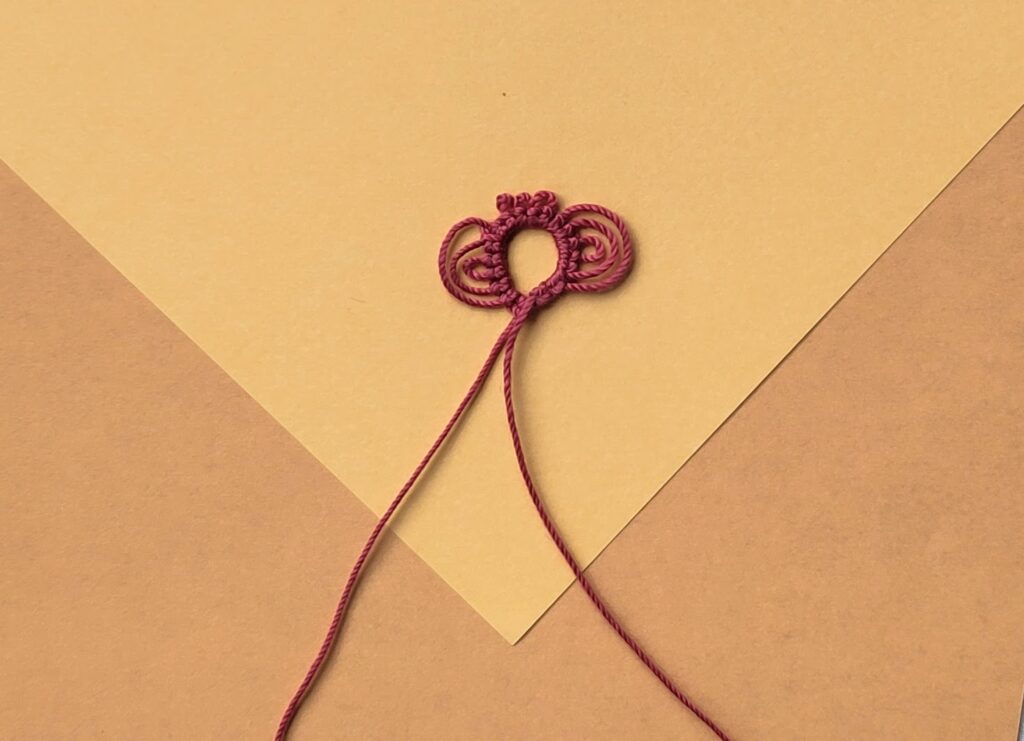
By the way, I am not completely satisfied with the picots in my cover image. They could still be more even. But it is worth sticking with it and continuing to practice. They become more beautiful over time.
How to make a double picot
- The Principle
For a double picot, we first make a simple but extra-long picot. Later, this picot will be joined back to the same element.
- An extra-long picot
Start a normal ring with five double stitches. Between the 5th and 6th stitch, make an extra-long picot. For your first attempt, you can use your first five double stitches as a guide. The distance between the 5th and 6th stitch should be about five times the length of those five double stitches. The finished picot will then be about 2.5 times as long as the five double stitches. A few millimeters more or less do not matter, but you need enough thread to lay the picot loosely around the next three double stitches of the ring.

- Joining
After the 9th double stitch, join the picot to its own ring. Make sure the picot is not twisted. Try to catch roughly the middle of the picot. As always, check immediately after joining that the core thread can still move freely.

- Closing the ring
Finish the ring with five more double stitches and close it.
- Making the picot(s) look nice
The picot probably does not look perfect yet. The half closer to the ring has a shorter path than the outer half. You can gently pull a little thread out of the join so that both halves have an even distance from each other.
Because these picots leave relatively long threads exposed, they benefit especially from pressing with an iron. With cotton thread you need high heat and steam. The result will be more durable if you starch it. With polyester thread, low temperatures are already enough to fix the shape.
Before starting a project with multiple picots, make a few test rings to determine the optimal picot length.
For evenly sized picots in different lengths, a picot gauge can also be helpful.
You might also want to take a look at my article about maintaining flow while making picots. maintaining flow while making picots..
By the way, I am not completely satisfied with the picots in my cover image. They could still be more even. But it is worth sticking with it and continuing to practice. They become more beautiful over time.
How to read patterns with double picots
Here you see the short notation for our example ring:
R 5  --* 4+(to the picot) 5

* as long as 5 × 5 double stitches.
Here is what the description means:
5 double stitches
—long picot
4 4 double stitches
+ join to the long picot
5 double stitches
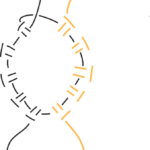
In diagrams, a picot is shown as a small line. A double picot is a longer line that touches the same ring at two points.

I know this looks very minimalistic, but the reduced representation allows the numbers for the double stitches to be placed precisely. Even in complex patterns, picots and rings remain easy to distinguish.
Triple, Quadruple, Quintuple… Picots
You have made your first double picots and now you want more? Easy!
Triple picot
Place an additional small picot exactly between the long picot and the joining point. In the example above, that would be after the 7th double stitch.
R 5 --* 2 - 2 +(to the picot) 5Quadruple picot
For the quadruple picot, you simply nest two double picots:
 R 5 --** 2 --* 2 + (to --*) 2 + (to --**) 5

--extra long picot
--long picot
Quintupel picot
Want to really show off? Then add a simple picot in the center of the quadruple picot.
R 5 --** 2 --* 1 - 1 + (to --*) 2 + (to --**) 5And you can keep extending the idea further and further…
Was this tutorial helpful for you? Feel free to leave me a comment.