Welcome to my Occhi (tatting) basics course. The course is divided into three parts and covers rings chains, picots and joining. This knowledge will already allow you to recreate many patterns.
- Tatting Basics 1 - Flipping Knots and your first Ring
- Tatting Basics 2 - Chains
- Tatting Basics 3 - Picots and Joining
Now we’ll start with your very first ring. Are you excited? This is going to be great. I’ll guide you through it step by step.
What are flipping knots?
I’ll explain why the knot needs to flip at the end of this post.
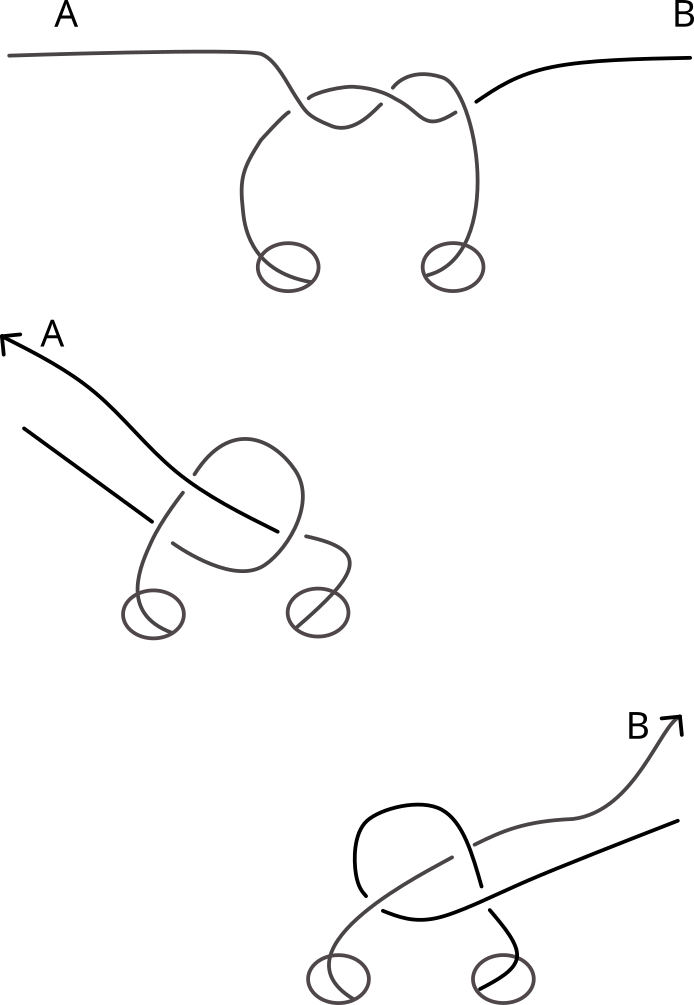
But first, let me explain how the knots flip. In the picture below you see two shoelaces: A (like Anna) and ch (like Berta). Anna and Berta are tied together as if we were about to make a bow. Feel free to grab a real shoe and follow along.
At first, Anna and Berta are completely relaxed. Then Anna suddenly remembers that she forgot to turn off the stove and quickly runs to the kitchen. Anna pulls, and Berta has no choice but to give in. You can see the result in the middle of the illustration.
The stove is off. Luckily nothing burned.
Then the doorbell rings. Berta is expecting a package and runs quickly to the door. Now Anna has to give in. The knot flips in the other direction. You can see what that looks like in the illustration below.
All three illustrations show the same knot. The only difference is the tension on the shoelaces. Sometimes Berta wraps around Anna, and sometimes Anna wraps around Berta.
Your first tatting ring without a shuttle
For your first ring you only need smooth cotton thread (for example crochet thread size 10 with a length of 280 m / 50 g).
For left-handed tatters: The words “left” and “right” do not appear in the text. You can simply mirror the pictures using any image editing software. The instructions will still work.
Whenever individual fingers are mentioned in the text, they always refer to the fingers of the holding hand (the left hand for right-handed people and the right hand for left-handed people).
Up in the front
Unwind about 50 cm of thread from your ball and lay the thread from bottom to top across your hand.
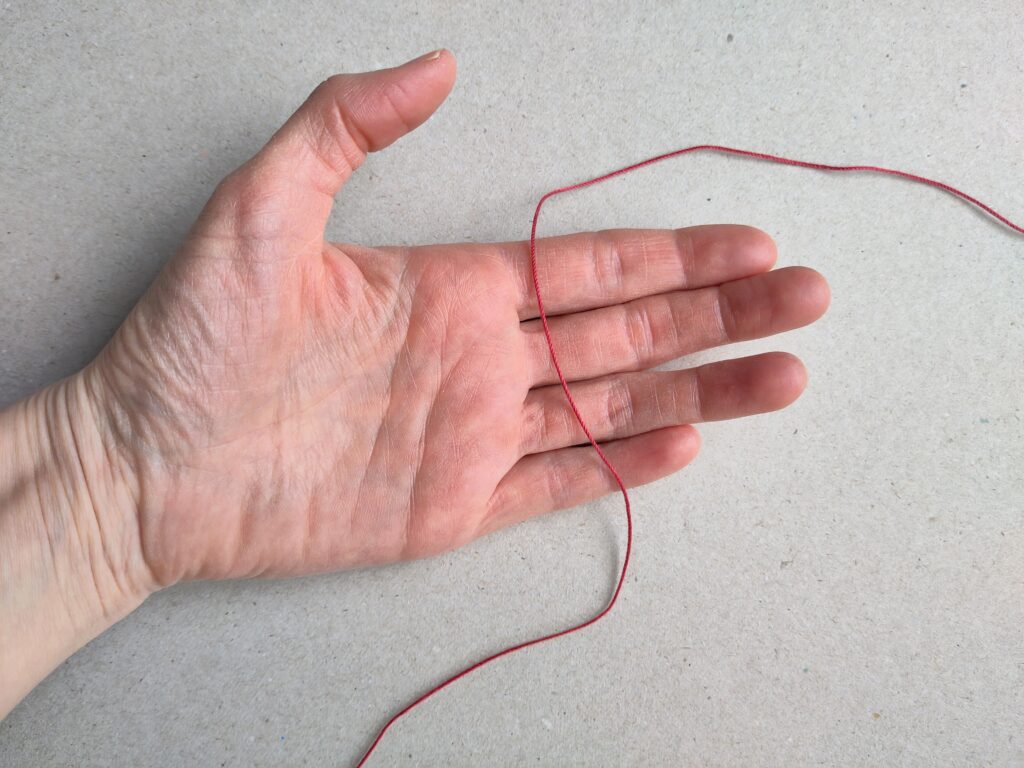
Down in the back, up in the front
Guide the thread behind your hand downward and then in front of your hand upward again.
Hold the crossing point of the front threads with your thumb.
The loop
You now have a loop lying on your hand. From the perspective of your wrist, it looks approximately like in the drawing.
A is the ball of thread
C is the loose end. We call it the shuttle end
I have already indicated the shuttle in the picture, but you don’t need one yet.
At point B the thread crosses. The ball thread lies over the shuttle thread.

Preparing the loop
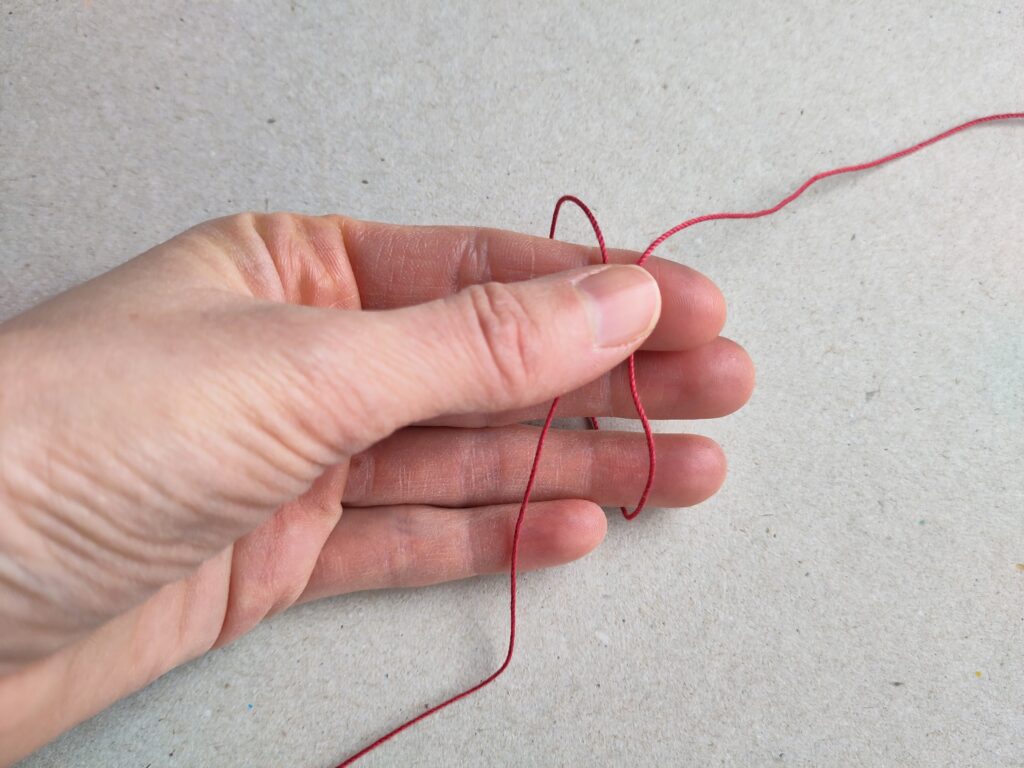
Hold the crossing point of the threads with thumb and middle finger, and spread your index finger slightly to create a little tension on the loop thread.
First half knot
Guide the shuttle thread with your free hand from the side through the loop. We call this knot an “under stitch", because it starts under the upper loop thread. Then guide it back as shown in the illustration. In the illustration, the knot has not yet flipped. Relax your index finger slightly and pull on the shuttle thread so that the knot flips. While doing so, think of Bertapulling Anna out of the kitchen, through the hallway, all the way to the front door.
Do not tighten the knot completely right away.
Keep the shuttle thread slightly taut and spread your index finger apart again. This allows the knot to slide over the core thread toward your thumb. Tighten it there and hold it in place with your thumb and middle finger.

Second half knot
Keep holding the first half knot with thumb and middle finger.
Continue spreading your index finger to keep tension on the loop thread.
Guide the shuttle thread over the loop thread first, and then back as shown in the diagram. This was already the second half knot, called the"over-stitch„.
Relax your index finger again and pull the shuttle thread until the knot flips.
Tighten the loop thread again so the finished knot slides next to the first knot. Then tighten the second knot.
First double stitch
Congratulations. You have just made your first double knot and started your first ring. You could now loose your thumb and middle finger. The ring would not fall apart any more.
For now keep your ring on the fingers and add more double knots.

Pulling more thread
After a few knots you will notice that the ring gets smaller and smaller.
The knots are formed from the loop thread. Even though the knots are small, they still use a noticeable amount of thread.
Eventually the ring becomes so small that you cannot make more knots.
To enlarge the ring again, take the unfinished ring off your fingers. Find the first knot you made. Hold that knot with one hand and pull with the other hand on the thread that comes out of it.
Closing:
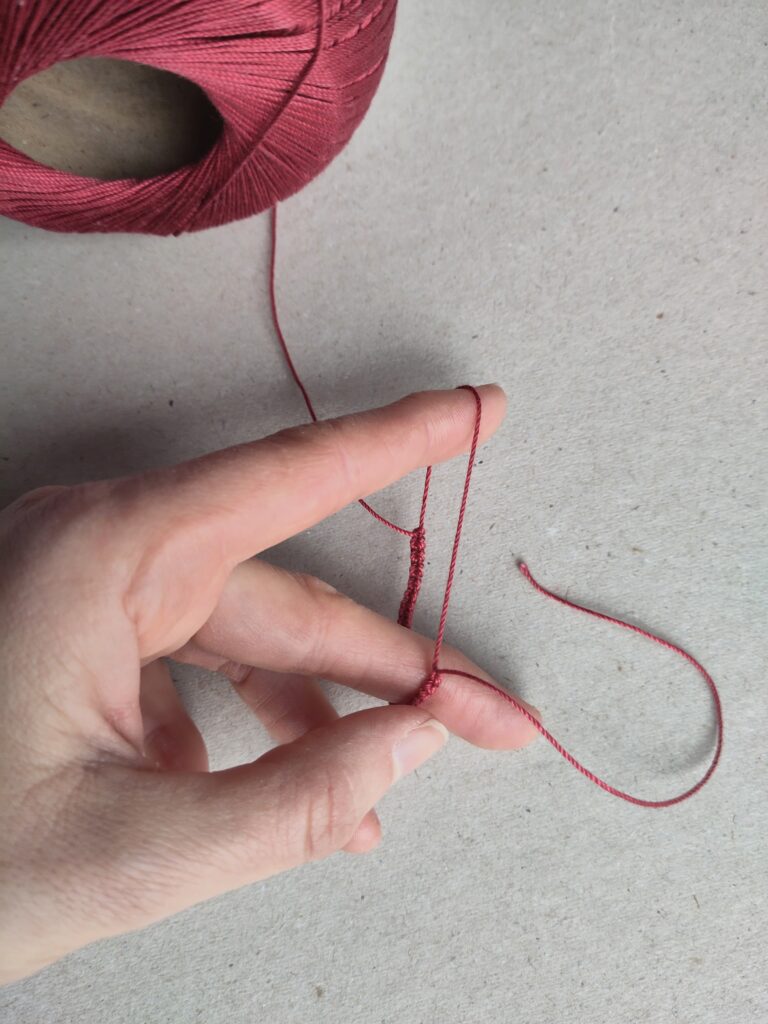
Once you have made 8 double stitches, you can close your first ring.
Hold the last double stitch and pull on the shuttle thread.
Do not close the ring completely at first. Leave a little space and spread the knots slightly apart. They should sit close together but still loosely next to each other.
The ring should not ripple, but lie smoothly on the table.
When the ring looks nice, pull it closed until the first and last knot meet.
If your first ring is not perfectly round or if it ripples a bit, that’s not a problem. You’ll gradually develop a feeling for it as you make more rings.
The important thing is that you understand how to make the knots and when to pull which thread.
Please be proud of yourself now.
You have just learned the core technique of tatting.
- Up in the front
Unwind about 50 cm of thread from your ball and lay the thread from bottom to top across your hand.

- Down in the back, up in the front
Guide the thread behind your hand downward and then in front of your hand upward again. Hold the crossing point of the front threads with your thumb.

- The loop
You now have a loop lying on your hand. From the perspective of your wrist, it looks approximately like in the drawing.
A is the ball of thread C is the loose end. We call it the shuttle end I have already indicated the shuttle in the picture, but you don’t need one yet.
At point B the thread crosses. The ball thread lies over the shuttle thread.
- Preparing the loop
Hold the crossing point of the threads with thumb and middle finger, and spread your index finger slightly to create a little tension on the loop thread.
- First half knot
With your free hand, guide the shuttle thread through the loop from the side. We call this knot the “under stitch”, because it starts under the upper loop thread. Then guide it back as shown in the diagram. In the diagram the knot has not flipped yet. Relax your index finger slightly and pull the shuttle thread so that the knot flips. Think of Berta pulling Anna from the kitchen, through the hallway, all the way to the front door. Do not tighten the knot completely yet. Keep the shuttle thread slightly tense and spread your index finger again. This allows the knot to slide along the inner thread toward your thumb. Tighten it there and hold it with your thumb and middle finger.
- Second half knot
Keep holding the first half knot with thumb and middle finger. Continue spreading your index finger to keep tension on the loop thread. Guide the shuttle thread over the loop thread first, and then back as shown in the diagram. This was already the second half knot, called the"over-stitch„.
Relax your index finger again and pull the shuttle thread until the knot flips. Tighten the loop thread again so the finished knot slides next to the first knot. Then tighten the second knot.
- First double stitch
Congratulations. You have just made your first double stitch and started your first ring. You can now let go of the ring without it falling apart. Go ahead and make more double stitches.
- Pulling more thread
After a few knots you will notice that the ring gets smaller and smaller. The knots are formed from the loop thread. Even though the knots are small, they still use a noticeable amount of thread. Eventually the ring becomes so small that you cannot make more knots.
To enlarge the ring again, take the unfinished ring off your fingers. Find the first knot you made. Hold that knot with one hand and pull with the other hand on the thread that comes out of it. - Closing:
Once you have made 8 double stitches, you can close your first ring. Hold the last double stitch and pull on the shuttle thread. Do not close the ring completely at first. Leave a little space and spread the knots slightly apart. They should sit close together but still loosely next to each other. The ring should not ripple, but lie smoothly on the table. When the ring looks nice, pull it closed until the first and last knot meet.
If your first ring is not perfectly round or if it ripples a bit, that’s not a problem. You’ll gradually develop a feeling for it as you make more rings. The important thing is that you understand how to make the knots and when to pull which thread.
Please be proud of yourself now. You have just learned the core technique of tatting.
Why do the knots have to flip?
If you’re wondering about that, simply try what happens if they don’t flip. Make a loop, place a few unflipped knots on it, and close the ring.
…I’ll wait here…
…and? What happened? Exactly — the ball thread, not the shuttle thread, closed the ring. Now comes the next ring. Try to place it very close to the first one.
…I’ll wait…
…doesn’t work, you say?
Hey, little stitch marker, stop giggling. You were a beginner once too!
Flipping knots allow us to place rings very tightly next to the previous element, which makes many patterns possible in the first place. Pretty brilliant, if you ask me.
Did this tutorial help you? I’m looking forward to your comment.